Saturday, June 9, 2012

Hemming A Panel Without Sewing

Here is a quick tutorial on how to hem a panel without a sewing machine.
Hope you find it useful.

To start off I measured an inch for the hem. Ok, maybe I didn't measure it with a measuring tape. I cheated I tell you I cheated!
LEA Lumiere

I'm being honest. This picture tells the truth and nothing but the truth. I basically used one of those iron on hem strips and used it as a measuring guide then secured it with pins all the way across.
[As pictured above and below.]
LEA Lumiere

LEA Lumiere

Next, get the iron warmed up and start ironing between the pins and across the hem area. LEA Lumiere

You'll notice the iron on strip hanging out - go ahead and cut the strip right at the edge of the panel and iron over the edge.
LEA Lumiere

Now you can remove the pins and give the hem a good ironing. You are all done! Here is a finished look of the hem without the need to sew.
LEA Lumiere 


Hope you find this post useful.
Until the next post,
LEA Lumiere

Thursday, June 7, 2012

Faux Capiz Pendant

Shut the front door! I forgot to share this DIY project! After all that hard work the least I can do is share the fruits of my labor, right?

These are the supplies you will need.
Parchment paper, wax paper, iron, ironing board, squeeze punch, many glue sticks, glue gun, wire, sewing machine and a lamp shade [some items not pictured].
LEA Lumiere

To start off cut two sheets of parchment paper and three sheets of wax paper. The length doesn't matter but try to cut them all the same length. Now layer the sheets as follows: one parchment paper sheet, three wax paper sheets and top with the second parchment paper sheet on top.

Now you want to iron those sheets just as they were laid out. Repeat this process for the entire roll of wax paper. Yes, I said the entire roll of wax paper. I think I used a total of three wax paper rolls for this project because I wanted my pendant to be nice and full.
LEA Lumiere

By the way if this should happen don't worry just cut the end right off and continue working.
LEA Lumiere

Now the real work begins. Start off by "sizing" the width of the squeeze punch circle then fold the entire sheet back and forth. You'll end up with one of those paper hand held fans -trust me its better than punching one circle at a time.
LEA Lumiere

Just take a look how cutting one circle at a time looks. Yeah, not the most time effective steps to take.
LEA Lumiere

Ok, lets get back to work.

After you have 14,000 circles hot glue them all together. Just kidding! But seriously after you gather about 30 circles lay a few of them out to get an idea of the length of each strip so you have a visual [as pictured]. I decided to have three rows and not four as pictured. After you determine the number of circles in each strip get your sewing machine out and sew those circles together. 
LEA Lumiere

Here I'd insert a picture of a few sewed strips of circles, how I added one row of wiring around the lamp shade skeleton and how to start assembling the pendant. But I forgot to snap pictures. Shame on me.

However, here is a yucky quality picture of the first few strips I sewed together and hot glued just to test out the length.
LEA Lumiere

Here is another picture of it while in progress. As you can see I glued the strips slightly over one another. I did this because I wanted a nice full looking pendant. Did you notice the lamp shade is upside down? Whoever thought of this idea is brilliant!
LEA Lumiere

And here my friends is the final product from different view points. LEA Lumiere

LEA Lumiere 
LEA Lumiere LEA Lumiere

This faux capriz pendant is hanging very nicely in my bedroom and has received many "oohh", "aahhh" and "WOW" since its display. I'll also have you know I've been requested to make four of these!

After getting a glimpse of how one of these is made how much would you sell one of these for?  What are your thoughts about this project? Do you like it?

Leave me a comment and please subscribe --you'll totally make my day and inspire me to share more projects.

Until the next post,
LEA Lumiere

Thursday, May 31, 2012

May Birchbox: CWs Gossip Girl


I know - I know we're only hours away from the month of June and here I am just getting around to sharing my May Birchbox. By the way have you visited their
website yet or become a member?

At any rate lets move right along with the contents of this here little box-o-surprises.

I must say I love the box cover. Do you watch Gossip Girl? I'm totally guilty of not watching it. I've heard of the show via commercials and such but haven't seen an episode.

LEA Lumiere

Here we have the lovely tissue paper wrapping our goodies.

LEA Lumiere 

I must say this is by far the best box I've gotten!
LEA Lumiere 

Alright so here are my two cents on each item:

Bvlgari - Omnia Cystalline de Toilette Spray- YUM! This is by far my favorite ever!
I LOVE IT! Its soft, clean, crisp, sexy, seductive and flat out delightful.
I must add this to my collection.

Color Club - Clambake Coral- I am loving these Color Club polishes. They last an
insanely long time. This color is perfect to use at this exact time of the season.
This polish doesn't need a top coat because it has the perfect shine. Love it.

Kiehl's- Abyssine Cream- I don't like the smell but I do like how it works. This tiny
jar has a good amount of product to test for a good two and half weeks. By the way
I used it only around my eye area and I like it. No wonder its a longtime bestseller.

Ojon- Damage Reverse Restorative Conditioner- as with all the Birchbox items this one
was also a like! It left my hair soft and smelling fresh. I may just buy it.

Bonus item is a notecard - its cute and simple nothing fancy. I don't know that I'll
ever use it but hey I may just use it as a book marker.

And here is the description card of all the samples included and the prices just incase you
want to buy them.
LEA Lumiere


That's all folks ... until the next post!
LEA Lumiere

Tuesday, May 22, 2012

Belated April Birchbox Post

Hello my darlings! I'm a day late and a dollar short with this post. Nonetheless I will share my April Birchbox items. Check them out.

As with my first Birchbox the inside was nicely decorated with tissue paper and
all items were nicely wrapped.
LEA Lumiere

Here is a close up of all the items.
LEA Lumiere 

And here is a list of all the items with a description and price just incase
you want to try them out for yourself.
LEA Lumiere

My thougths on each items go a little something like this...

Benta Berry G-1 Exfoliating Facial Cleanser - indeed this cleanser is creamy and softly exfoliates. My skin was left soft and I must admit it was quite "bright".

Pangea Organic Lip Balm - I love everything about this lip balm with the exception of the smell. WOW it sure is a strong "in your face" smell. It does wear off after a while but for the time you can smell it - I really don't like it. Otherwise it does leave my lips soft, soft and soft.

Weleda- Pomegranate Firming Day Cream - this felt no different than my day time Olay face cream/lotion. In my opinion for something to make a noticeable difference a tiny sample doesn't do it. This one was enough for a two day use and this one here made my skin feel soft all day long.

Wonderstruck Taylor Swift - I love some Taylor Swift songs but not so much this perfume. I'm not much for strong smelling perfumes. Perhaps after the day progresses the smell will not be so strong and I'll end up liking it - perhaps I shall try all the sample again? I'll toss it in my purse just incase I walk out of the house without perfume.

Beauty Extras - both items were good for the one time use. My opinion again for me to see/feel a difference I'd have to use it more than once. For this one use facial scrub and eye cream - its was nice.

That's my two cents on this here belated Birchbox treat. By the way I got my sister, Pattie, into Birchbox and she says its a montly treat and nice way to sample items you wouldn't otherwise sample. I couldn't agree more.

Until the next post,
LEA Lumiere
*This is not a sponsor blog post. I paid for the monthly membership with my own money. These are my opinions and thoughts of items received.

Tuesday, May 1, 2012

No Chip Nails

Hello there glad you can join me. Shall I get to the nitty gritty of this post? Is that a yes? Well then lets carry on shall we? I've heard so much about the no chip nails when I get my nails done that I figured why not do some research first.

I found several reviews on this product and thought "hhhmm why not try it for myself?" So, off I go and purchased Nailene SensatioNail starter kit. I saw something similar at Ulta and figured this was pretty much the same concept.
LEA Lumiere

Before I show you the end results just look at my horrible nails. The things that happen when I don't put enough time into my nails.
LEA Lumiere

Ok, moving right along. I unpolished my nails and lightly buffed the nail bed.
[Let me say I was so mad when I broke my nail. ugh]
LEA Lumiere

This is all included in the box o' goodies.
LEA Lumiere

Here is a close up of the little bottles.
LEA Lumiere

This is how my nails turned out.
 LEA LumiereLEA LumiereLEA Lumiere

Not to shabby. However, after a week and a half this is what happened to my nails.
LEA LumiereLEA Lumiere

Sad. So sad. The nail color looked dull. And my index finger nail broke [my car door came right at me and by impulse I put my hand out to catch the door. aahh, finger nail bent all the way back -insert scream here- OUCH!]

My over all opinion of this products is ...
Although it seems pretty simple when you read the instructions it really is a time consuming process. Shall I say "for me" it was a time consuming process? The removal process was an even bigger pain in the neck. Soaking with 100% acetone for 45 plus minutes and using my nail drill didn't make me a happy camper.

Would I use this product again?
Possibly. But only because I didn't save my receipt and I can't return the darn thing. I must add that I used another similar product and that one took even longer. eekk.

Conclusion, I will use this product again with the hope that practice makes perfect. I'm a believer.

Now for the questions of the day. Have you used this product? What was your experience?

Until the next post,
LEA Lumiere 
Please note: The items mentioned in this post were purchased by me. In no way, shape or form have I been compensated for this review. Nailene doesn't even know who I am... yet.

Friday, April 6, 2012

Living Room Lighting

BAM!!! "Then there was light." Yeah that would pretty much sum it up for me, seriously. When I rented my apartment a few years ago I failed to notice there weren't any light fixtures in the living room {enter long sigh}. I blame it all on the two windows that let in a tremendous amount of sunlight. Hey, that's my story and I'm sticking with it.

This is what I got to fix that little issue.
LEA Lumiere

Needless to say this wouldn't last long. So, after a long search for a drum lamp shade I found this one...
LEA Lumiere

It is so 70's isn't it? As a matter of fact while watching "Just Wright" I spotted this very lamp shade in the background. Ok, maybe it wasn't my drum lamp shade but it sure was its twin. Anyway I took a field trip to the local hardware store and purchased lighting items and came home to piece these items together.

After a few hours of piecing this ...
LEA Lumiere

LEA Lumiere

I came up with this...
LEA Lumiere

LEA Lumiere

I have to get one of those circular panel things that block the visibility of the lightbulbs. But for now I'm really loving this.


Until the next post,
LEA Lumiere

Friday, March 30, 2012

How To: Creating Eyebrows Using Powder

Hi everyone! Today I'm sharing how I create my eyebrows using eyebrow powder. Yes, I said create. I do not have naturally glamorous eyebrows so in order to achieve
a semi-presentable pair of eyebrows I create them.


This is how my undone eyebrow looks --eekk-- no shape and its not full.
LEA Lumiere

Let's get started...

Comb your brows in the direction in which they grow.
LEA Lumiere

Next using an eyebrow powder line the bottom part of your brow.
LEA Lumiere

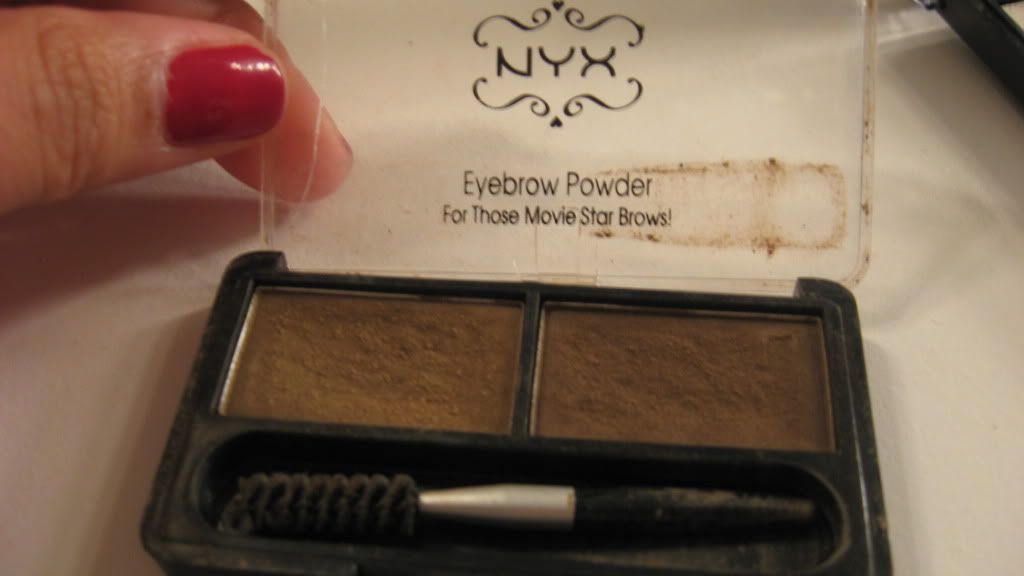
By the way I am using NYX eyebrow powder in Taupe/Ash.
I am using the darker shade of the two shown.
LEA Lumiere

Do the same for the top part of your brow. If you are creating an arch make sure you don't make it to sharp as it may not look natural.
LEA Lumiere

Using a feather like motion add powder between the lines you've created.
The results should look a little like this...
LEA Lumiere

Keep in mind that there are many tips and tricks for eyebrow application, this is just one of them.

Basic How To's of Eyebrows:

1) When possible use two colors.
2) Light color is applied to the inner quarter of the brow through about the mid point.
3) Darker color is applied from point where light color ends (right before arch) through the tail of the brow  (be sure to blend both colors). 
    4) Follow above steps (1 & 2) for pencil application. For the light part use a light handed application and for the darker part simply build on the color.

Hope that helps and let me know if you try this.
Stay tuned for part two of this post
"Define Your Brows"


Until the next post,
LEA Lumiere
*This is not a sponsored post. All items used or shown have been purchased with my own money.
For business inquiries please email lealumiere@yahoo.com subject line Sponsor Blog Post*